How to customise your WordPress hosted websites with your own domain

Ben Davies is a Bangkok-based journalist, photographer and author whose work has appeared in a wide range of distinguished publications and media. During the course of his career, Ben has reported from over 50 countries around the world. With his extreme schedule, Ben chose WordPress’ hosted platform to house his popular blog. From its easy-to-use publishing interface, extensive plugins libraries and built-in photography themes to tech-free hosting responsibilities, WordPress was a great choice for Ben.
But as with other free hosted services, Ben’s account and website is tied to a WordPress.com-branded domain name such as http://bendavies.wordpress.com. For users like Ben who truly want to make the website their own, WordPress has add-on options such as Domain Mapping. Domain Mapping is more than just domain forwarding because visitors to your website will see your .asia domain name in the browser’s URL bar and mapped to each individual page, such as www.BenDavies.asia.
URL Comparison and example:
Default WordPress URL: http://bendavies.wordpress.com
Domain Mapped WordPress URL: www.bendavies.asia
Today, the Domain Mapping option from a WordPress.com account costs US$13/yr (payable to your WordPress.com account). Once, you have purchased, the add-on from within your WordPress.com account, it’ll require you to point your .asia domain’s nameservers to WordPress.com’s servers.
Here are the steps: (as provided by WordPress.com)
* Before You Map a Domain
To get started, make sure:
- There is an upgraded WordPress.com plan on your site.
- The name servers for the domain are updated to point to WordPress.com (this can be completed after mapping is added)
Step 1:
From your WordPress.com account, go to Domains Page by selecting My Site → Domains section of your dashboard.
Step 2:
Select Add Domain on the right.

Step 3:
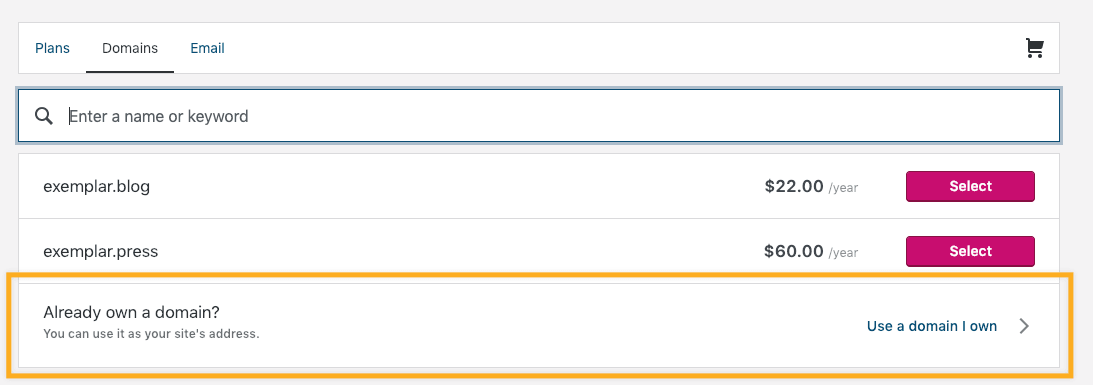
Select Use a domain I own.
Step 4:
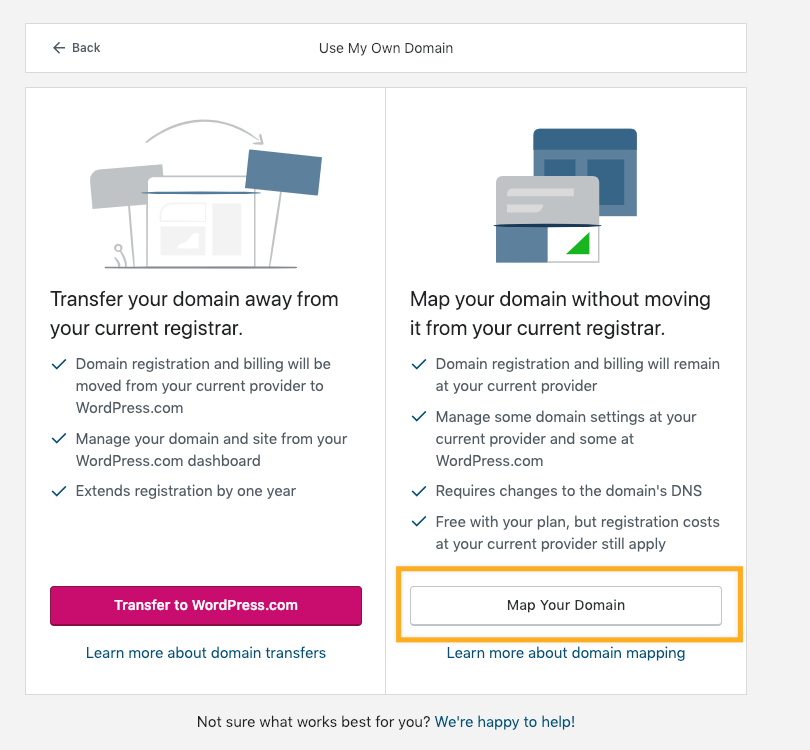
On the next screen select Map Your Domain.
Step 5:
Enter the domain you’d like to map and click the Add button. Then complete checkout.

Step 6:
Now that WordPress is setup, we need to tell your domain that another server will be handling the web traffic.
Log into your Domain Registrar account’s control panel and find an area to manage your name servers.
Step 7:
- Replace any existing name servers with these three domain name server (DNS) addresses (as provided by WordPress). They should be:
NS1.WORDPRESS.COM
NS2.WORDPRESS.COM
NS3.WORDPRESS.COM - Remember to remove your old name servers when you add the WordPress.com name servers.
You can try to find your domain provider in this list of common providers for further instructions.
Option 2: Contact Your Domain Registrar
If you’re not comfortable making the change yourself, you can contact the support department at your domain registrar for help. Here is a sample email you can send them:
I would like to use my domain with a WordPress.com site. In order to do this, I need to point my domain’s name servers to the following:
ns1.wordpress.com
ns2.wordpress.com
ns3.wordpress.com
Step 8:
- Go to the domains page (My Site → Domains) and make sure the domain you just mapped is set as your primary domain.
- The domain might not load right away. It can take up to 72 hours for your domain name servers (DNS) to update fully. You will also likely need to clear your browser’s cache.
- If you had other services connected to your domain, such as email or subdomains, you may have to reconfigure the DNS settings on WordPress.com’s end.
- If you later decide you no longer want to point your domain to WordPress.com, you can log into your registrar/DNS provider to remove the DNS records and point the domain elsewhere.
That’s it!
For official instructions and details about Domain Mapping from the WordPress.com, please visit:
http://en.support.wordpress.com/domains/map-existing-domain/
 Tip:
Tip:
If you are on a different blog service such as Wix, Squarespace, Blogger or Typepad, they also offer Domain Mapping and you can map your .Asia domain to those websites in similar fashion. Please see the official instructions offered from these respective websites:
Wix: https://support.wix.com/en/domains/connecting-domains-purchased-elsewhere- Squarespace: https://support.squarespace.com/hc/en-us/articles/205812378-Connecting-a-domain-to-your-Squarespace-site
- Blogger: (referred to as ‘Custom Domain’) https://support.google.com/blogger/troubleshooter/1233381?hl=en
- Typepad: http://help.typepad.com/domain_mapping.html
Why Get a .Asia Domain?
.Asia is the designated web address for Asia and Asian communities world wide.
When you register a .Asia domain you are joining an online, global community that supports and brings together Asians from every part of the world. Show your Asian pride whether you are from Los Angeles, Beijing or New Delhi.
You might also like...

My Favorite Asian American Artists in 2021
Here are some of my favorite Asian American artists and entertainers in films, music, and performing art. I’ve followed their journey for many years. During the pandemic, art became a form of therapy for me.

Asian American Sustenance and Food Culture
Food is a vital part of culture. Through food we are joined via a shared experience. It is a connection to our earliest memories, our heritage and some say, an intercultural communicator.

Asian Pacific American Heritage Month – A Conversation with Raymond King
May is Asian Pacific American Heritage Month in the U.S. and Asian Heritage Month in Canada. Whether you are Asian American or Asian Canadian, May is a time to celebrate and take joy in Asian culture and community.
This May, we are dedicating our post to our channel partner Porkbun.com, founded by Asian American tech entrepreneur Raymond King.
Other posts in this series...
No Results Found
The page you requested could not be found. Try refining your search, or use the navigation above to locate the post.